Zwift Zone 2 training sounds simple: pedal easily, ride for a long time, don't overdo it. In practice, though, indoor sessions often end up harder than intended. An FTP set too high, poor cooling, the wrong trainer mode, or a social ride with repeated power spikes can quickly turn a steady aerobic session into something that creates more fatigue than benefit.
Key takeaways
1. Zwift power zones are based on FTP, not heart rate.
2. Power leads, heart rate confirms, and RPE plus the talk test help keep you from overcooking the session.
3. ERG is useful for holding a steady load; free riding is useful for self-pacing and real-world practice.
The key point is not hitting one perfect number. What matters is staying reliably enough in the right workload zone on Zwift that you can accumulate plenty of time in zone without unnecessarily draining yourself for the next few days. That's exactly why Zone 2 is useful for endurance, recovery, and long-term performance. For more context, see our overview of heart health & endurance.
This guide shows you how to set up Zone 2 training on Zwift in practical terms, when ERG makes sense, when free riding is the better option, how to read heart rate, power, and RPE together, and which common Zwift mistakes most often make an "easy" ride harder than it should be.
Where Zone 2 Fits on Zwift
Zone 2 is not a magic range, but it is a very useful one. In practical terms, it sits below the first clear threshold, in a range where breathing, conversation, and fatigue still feel controlled. In endurance threshold models, low intensity is often placed below VT1. In endurance athletes, Zone 2 is typically described in relation to the first ventilatory threshold, even though platforms, coaches, and community discussions often use different zone models.
That is also why people online often talk past each other. Zwift generally uses FTP-based power zones. Heart-rate zones, by contrast, are based on a different signal that may lag behind power changes and can be influenced by factors like temperature, hydration, and fatigue. So when someone says "Zone 2," they might mean a power zone, a heart-rate zone, or a physiological range below LT1 or VT1.
For practical use on a smart trainer, a simple translation works well: if power is controlled, breathing stays calm, and you could still speak in full sentences, you are probably in the right range. That is less precise than lab testing, but often precise enough to make good training decisions.
Quick Answer
Zone 2 training on Zwift means long, controlled aerobic work at an intensity that feels clearly sustainable. The easiest way to guide it is with power, because indoors power is more stable and more immediate than heart rate. Use heart rate and RPE as a cross-check, not as rivals to power. Start conservatively with manageable duration, and first increase time in zone, not intensity. If the workout feels "just a bit too demanding," it was often already too hard for true Zone 2.
- Zwift power zones are based on FTP, not heart rate.
- Power leads, heart rate confirms, and RPE plus the talk test help keep you from overcooking the session.
- ERG is useful for holding a steady load; free riding is useful for self-pacing and real-world practice.
- The most important outcome is time in zone, not the highest possible average power.
- Progression should come first from more duration, then optionally from a bit more variability without drifting into higher intensity.
If you want to quickly check whether your ride was truly easy enough, you can log your sessions with heart rate, RPE, and notes in the huuman app and run through a simple Zone 2 checklist in under a minute after each ride.
How to Hit Zone 2 on Zwift
Zwift displays power very clearly, but the platform does not interpret the ride for you. For that, you need three guideposts that work better together than any one of them alone.
1. Use power as your primary guide
Indoors, power is usually your best steering tool. It responds instantly, is easy to see, and helps you avoid spikes. On platforms like Zwift, Zone 2 is often derived from FTP-based power zones, which makes day-to-day pacing practical and manageable. The exact percentages vary by zone model, though, so hard numbers without a clear model usually create more confusion than clarity.
2. Use heart rate as a reality check
Heart rate is useful, but it lags. Early in a ride it may still be low even when power is already too high. Later on, it can rise at the same power because of heat, dehydration, fatigue, or caffeine. That is why heart rate is best used as a confirmation signal in Zwift Zone 2 training: does it broadly match the easy range you would expect, or is it drifting upward more than it should for that level of power?
3. Use RPE and the talk test as a safety layer
RPE asks the honest question: how hard does this actually feel right now? Zone 2 should feel easy to moderate, not heavy, not gritty, not like you are pushing through. The talk test helps because it reflects breathing directly. If you can only get out short phrases, you are usually riding too hard for a classic Zone 2 session, even if the power numbers supposedly "fit."
A simple practical checklist
- Power/FTP: Use your Zwift power zone as a starting point. If your FTP is uncertain, start conservatively and check it against feel and heart rate.
- Heart rate: It should respond with a delay early on and not rise out of proportion later. A rising trend can point to drift, heat, or too much load.
- RPE: Easy to moderate. You can stay focused without feeling like you have to "push through."
- Talk test: Full sentences should still be possible. If you are gasping, the intensity is probably too high.
- Breathing: Calm and controlled, not strained.
- End-of-ride feel: More "I could have kept going a bit longer" than "thankfully that's over."
ERG or Free Riding: Which Works Better for Zone 2 on Zwift?
Both can work. The better option is the one that keeps you in the target range more reliably.

ERG mode
In ERG mode, the smart trainer holds the target power steady. That reduces mental load and is especially helpful if you tend to go too hard when riding freely or react to every small terrain change. For classic steady endurance rides, it is often the cleanest option.
The downside is that if your FTP is set too high, ERG will very reliably keep you in the wrong zone. There is also the familiar cadence spiral: when your cadence drops, resistance rises, which makes pedaling harder, which can push cadence down even more. In Zone 2, you will often notice this as legs suddenly feeling heavy, breathing getting less relaxed, and the sense that you are fighting the trainer.
SIM or Resistance mode
Free riding feels more like riding outside. You control the power yourself, can vary cadence and position more naturally, and learn to regulate effort more actively. That is especially useful if you also pace yourself outdoors by feel and power.
The downside is power spikes. Climbs, bunch surges, Zwift events, and small lapses in attention can push you out of Zone 2 very quickly. If you use free riding, you need a clear upper limit in mind and a display layout that keeps power and heart rate easy to see.
The short decision guide
- Choose ERG if you want steady load, less decision-making, and clean time in zone.
- Choose free riding if you want to practice self-pacing and can actively avoid power spikes.
- Switch to ERG if easy rides keep turning into unplanned mixed-intensity sessions.
- Switch to free riding if ERG feels artificial, too rigid, or unexpectedly hard.
How to Set Up Zwift for Zone 2
Many Zone 2 problems on Zwift are not caused by poor fitness, but by poor setup.
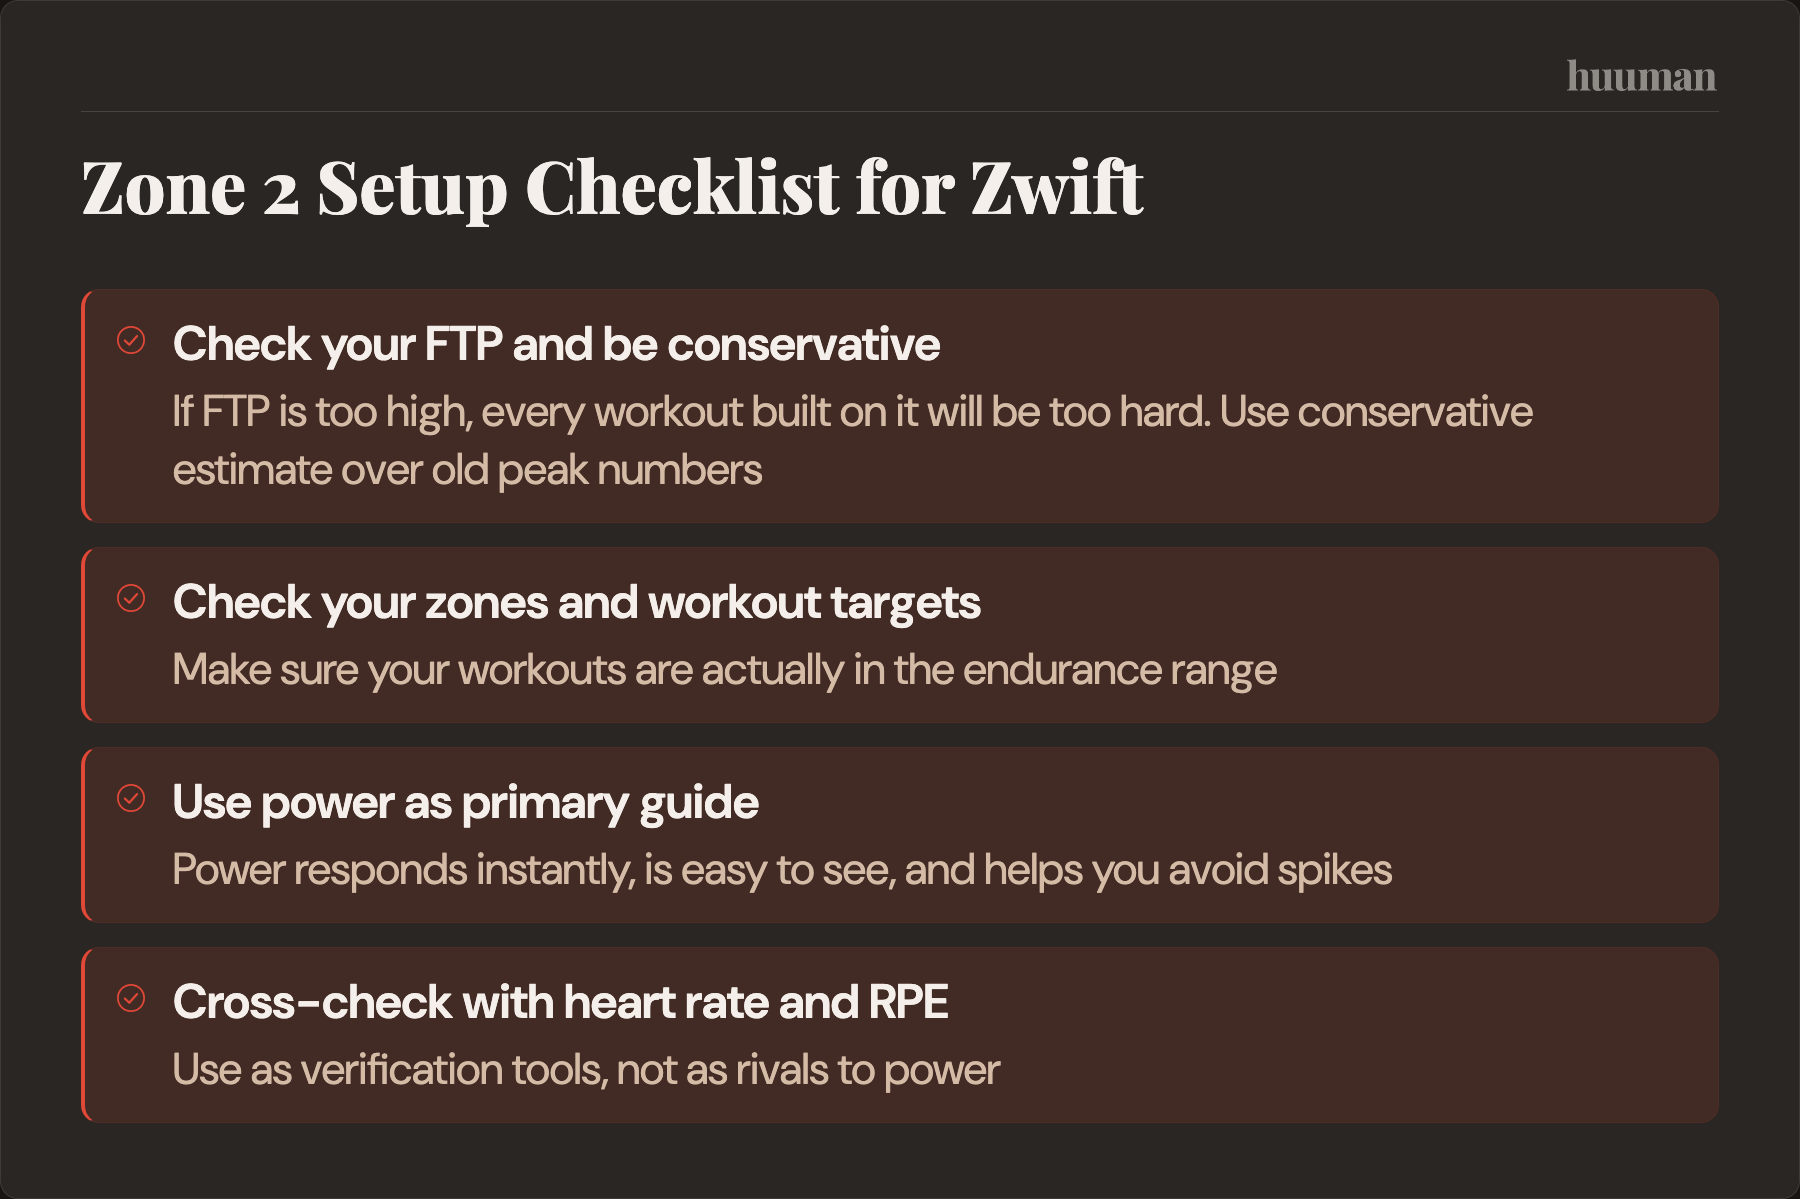
1. Check your FTP and be conservative
Your Zwift power zones depend on FTP. If that number is too high, every workout built on it will be too hard. If you do not have a current test, a conservative estimate is usually more useful than an old peak number from a period when you were especially fit.
2. Check your zones and workout targets
Make sure your workouts are actually in the endurance range. Zwift workouts, custom workouts, and the workout builder are often easier for this than spontaneous free rides because you can define the duration of the main block clearly.
3. Choose the right mode
For steady rides, ERG is often the simplest choice. For group rides or routes with lots of small changes, free riding may work better as long as you actively respect a power cap.
4. Do not underestimate cooling
Indoor heat is one of the most common reasons for elevated heart rate and poor pacing decisions. A good fan does not just improve comfort; it often improves how well you tolerate the workload. If power and RPE stay the same but heart rate is clearly higher without proper cooling, that is not a motivation problem. It is context.
5. Protect data quality
A chest strap is usually more useful than an optical wrist sensor for this type of training. Also pay attention to whether Zwift is using power from the smart trainer or from a power meter. Different sources can vary slightly. For week-to-week tracking, consistency matters most: it is better to use the same source every time than to switch back and forth.
Checklist: Zwift setup for Zone 2
- FTP is current or deliberately set conservatively.
- The workout or route fits calm, steady riding.
- Trainer mode is chosen on purpose before the session, not left on by accident.
- Power, heart rate, and time are visible in your display layout.
- The fan is on from the start, not only once you are already overheating.
- Your drink is within reach, so lack of preparation does not get confused with training load.
- Interruptions from tech issues, messages, or setup changes have been minimized beforehand.
Simple Session Structures for 45 to 120 Minutes
You do not need complicated programming for Zone 2. The structure should help you stay in the zone, not impress you.
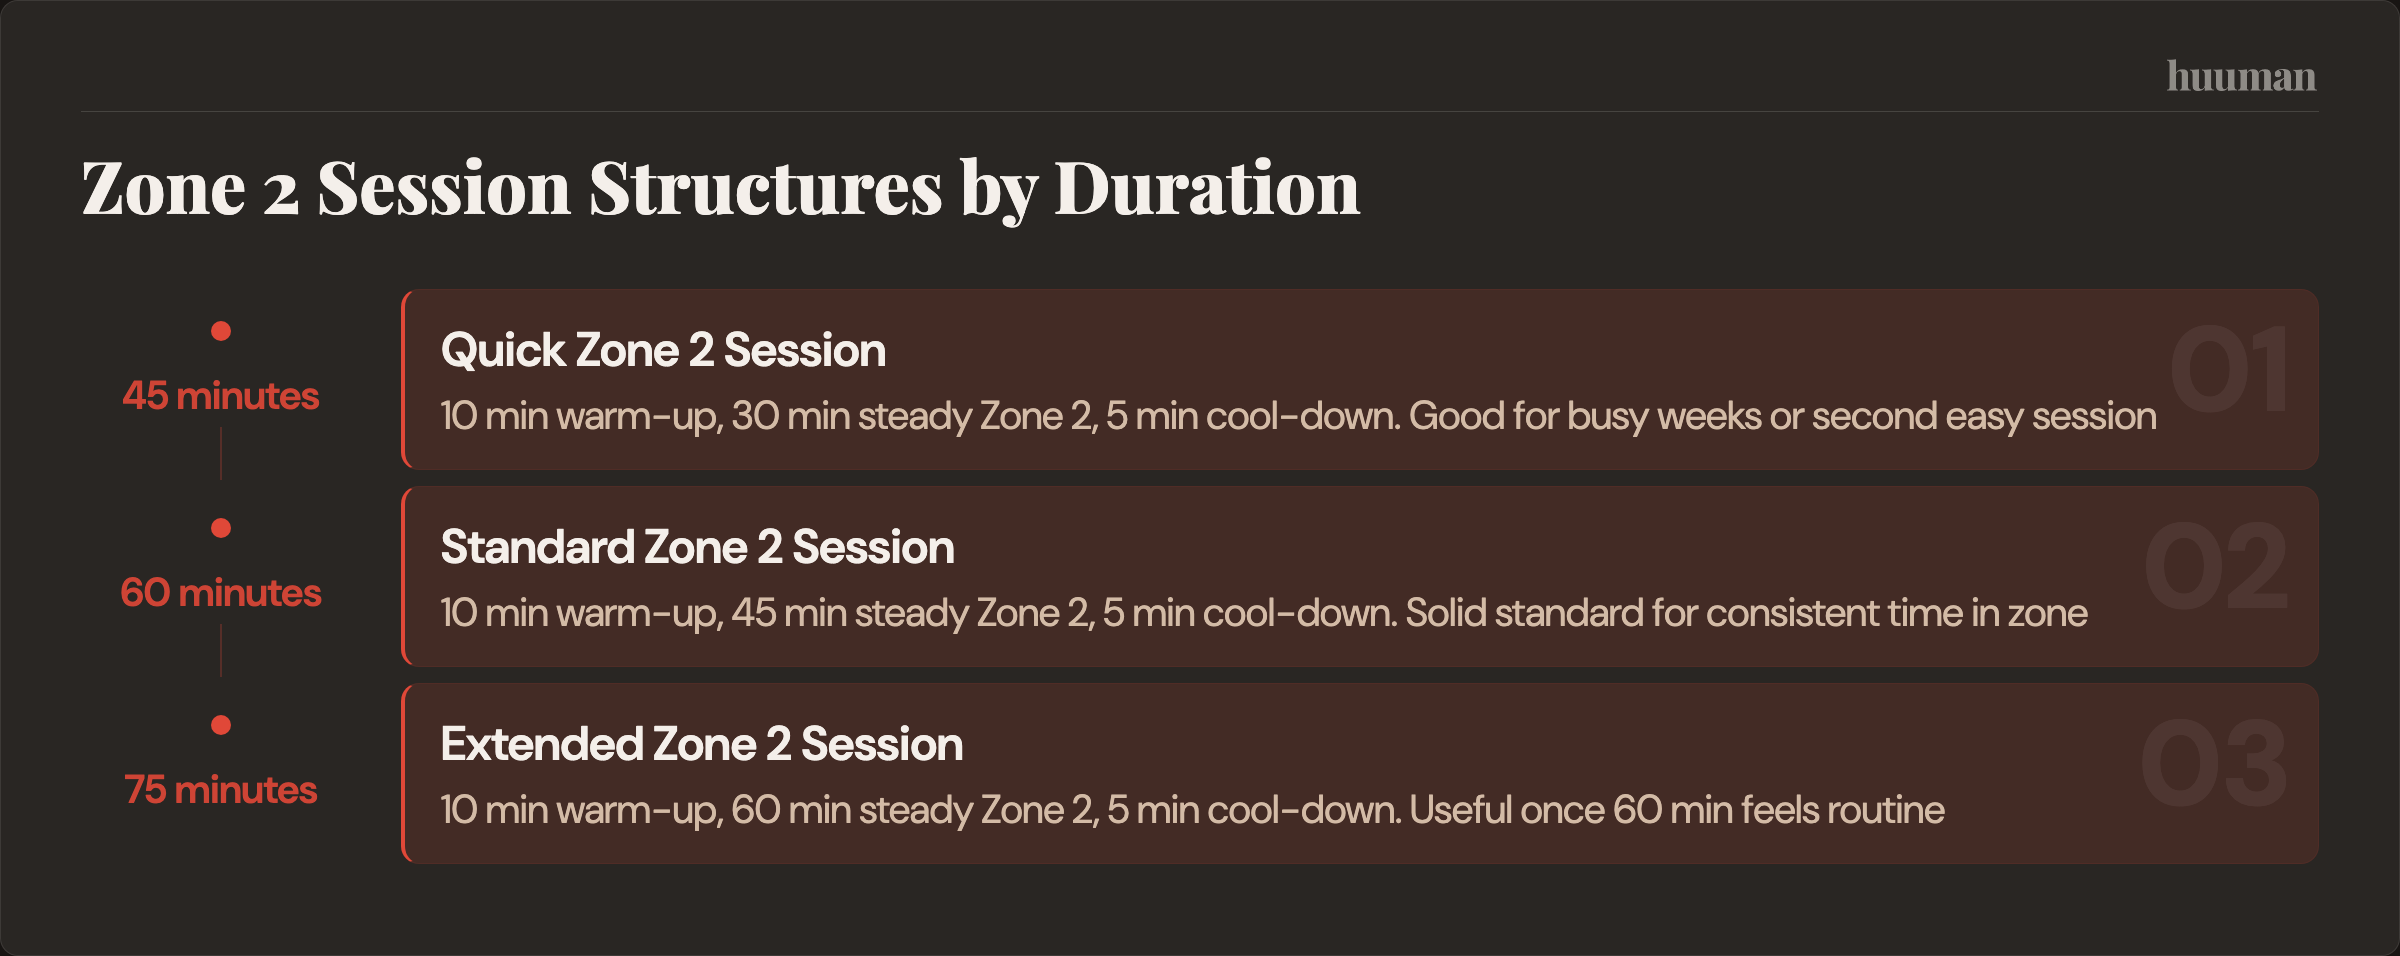
45 minutes
10 minutes progressive warm-up, 30 minutes steady Zone 2, 5 minutes easy cool-down. A good fit for busy weeks or as a second easy session.
60 minutes
10 minutes warm-up, 45 minutes steady Zone 2, 5 minutes cool-down. A solid standard session for consistent time in zone.
75 minutes
10 minutes warm-up, 60 minutes steady Zone 2, 5 minutes easy cool-down. Useful once 60 minutes feels well tolerated and you want to build duration first.
90 minutes
10 to 15 minutes easy warm-up, 65 to 75 minutes steady Zone 2, 5 to 10 minutes cool-down. At this point, cooling, hydration, and saddle comfort matter much more.
120 minutes
15 minutes very controlled warm-up, 95 to 100 minutes Zone 2, 5 to 10 minutes easy cool-down. These sessions make the most sense if you can complete them without falling apart, showing obvious drift, or carrying unnecessary fatigue into the next days.
Protocol card 1: Z2 steady ERG
A common setup is 10 minutes of progressive warm-up, then 40 to 90 minutes of constant Zone 2 in ERG mode, followed by 5 to 10 minutes easy. Power is the primary control, heart rate is the check, and RPE is the brake. At the minimal end, this might mean two shorter sessions per week with an optional extra easy ride. A standard version uses multiple sessions with a bit more time in zone. At higher volume, the main progression comes from longer duration, not higher intensity.
Protocol card 2: Z2 free ride with a power cap
A common setup is 10 minutes easy, then 30 to 110 minutes of free riding with a clear upper power limit, followed by 5 to 10 minutes easy. On climbs, you deliberately back off. In group rides, it is better to let gaps open than to collect repeated power spikes. RPE and the talk test matter especially here, because the terrain can pull you out of the zone more easily.
Protocol card 3: Z2 with cadence variation
If monotony is the main problem, try 4 to 6 blocks of 8 to 12 minutes in stable Zone 2 while varying cadence slightly. The intensity stays the same; the change in stimulus comes from pedal feel and attention. Short cadence changes are not the same as intervals. They are simply there to make the ride mentally and technically easier to execute.
Evidence and Limits
The broader evidence does support the idea that a large share of low-intensity training is commonly used in endurance work, especially among trained athletes. A systematic review in trained cyclists supports polarized training intensity distribution and describes low intensity as a major part of common models. That does not mean every athlete should follow one fixed distribution, or that every easy ride automatically lands in physiological Zone 2.
It is also best to be cautious when talking about minimum doses. For general health guidance, the ACSM recommends at least 150 minutes of moderate endurance training per week. That is a broad public-health guideline, not a Zwift-specific formula for performance. Training history, total load, recovery, daily stress, and the quality of your truly easy sessions all matter.
As for the commonly discussed physiological effects of Zone 2-type aerobic work, there are plausible mechanisms and a lot of coaching practice behind them, but the sources provided here do not directly support precise claims about mitochondrial biogenesis, fat metabolism, or exact progression rates. So some restraint is appropriate: a lot of easy work is a standard part of endurance training, but it does not work in isolation or independently of the rest of your training and recovery context.
The same applies to exact percentages of FTP or heart rate. Without a clearly defined model and individual context, they create a sense of precision that often does not exist in real training. On Zwift, it is usually smarter to choose a plausible FTP-based zone and then verify with heart rate, breathing, and sustainability whether it really represents easy aerobic work for you on that day.
Approaches to Discuss With a Coach or Clinician
If you want to fit Zwift Zone 2 training into everyday life, the best structure is the one you can repeat consistently for weeks.
Strategy A: Limited time, high consistency
Many plans use two to three endurance sessions per week, including one longer and one shorter Zone 2 ride. An extra very easy ride can be added if needed. This works well during busy workweeks, especially if you also want room for strength training or some higher-intensity sessions.
Strategy B: Solid aerobic base building
A common approach is to spread several easy to moderately long sessions across the week and stay deliberately very easy between them. That increases total time in zone without making every individual ride especially long. If you are also working toward other goals, for example with a Zone 2 training plan guide or with a focus on improving VO2max, then when you place your easy rides matters more than chasing the "perfect" single session.
Strategy C: More volume, clearer readiness checks
As volume rises, context matters more. HRV, resting heart rate, sleep quality, heavy legs, and mental freshness can all help you decide whether to reduce volume or keep a ride very easy. HRV is a decision aid, not an oracle. If several signals are pointing the wrong way, a shorter or easier session is often the better choice.
If you also include hard training, do not just stack it on top without adjusting the rest. If you are already doing structured intense sessions, such as a HIIT workout plan, Tabata high-intensity workouts, HIIT on an elliptical, or even very short formats like our one-and-done workout guide, then Zone 2 should mainly support your base rather than quietly becoming another layer of stress.
How to Measure Progress
The most important metric in Zwift Zone 2 training is time in zone across weeks. Not your hardest ride, not your prettiest heart-rate curve, not your highest average number. Good trends are boring, repeatable, and sustainable in real life.
What you can note after each session:
- session
- current FTP setting
- goal of the ride
- average or planned power
- heart-rate trend
- RPE
- how much drift you noticed
- sleep or general readiness
- cooling, room feel, and anything unusual
Two simple signs of progress are especially useful. First: the same power feels easier. Second: at similar power, heart rate stays steadier or drifts less, without you becoming obsessed with one rigid number. Cardiovascular drift can occur during longer endurance efforts, but in day-to-day training what matters more is whether your drift stays plausible for the conditions or suddenly falls outside your normal pattern.
A simple tracking template you can copy into Notes or Notion might look like this:
- Session | FTP setting | Goal | Power | HR | RPE | Drift | Sleep | Notes
- Example: 60 min Z2 ERG | FTP set conservatively | steady easy ride | power stable | HR appropriate from minute 20, slightly higher near the end | RPE easy-moderate | moderate | sleep okay | fan worked well, legs felt a bit heavy at the start
If you want to see patterns like this more systematically, your huuman Coach can turn your sleep, training load, and goals into a weekly plan and help you make better decisions for the following week instead of overreacting to one ride.
Signal vs. Noise
- Signal: More time in zone across several weeks. Next step: assess the monthly trend, not one workout.
- Signal: Stable power without constant spikes. Next step: check your display layout and keep the key fields visible at all times.
- Signal: The same watts feel calmer and easier. Next step: jot down RPE and how easily you could speak at the end of each session.
- Noise: Chasing one perfect Zone 2 number. Next step: use numbers as guardrails and check them against feel and heart rate.
- Noise: "Easy" group rides that slowly become faster. Next step: set a power cap and let the group go if needed.
- Noise: Using heart rate as the only guide in the first minutes. Next step: pace early on mainly by power and breathing.
- Signal: Better cooling clearly lowers perceived effort. Next step: standardize your fan and room setup before every longer ride.
- Noise: Making fat-burning myths the main goal. Next step: focus on sustainability, time in zone, and overall recovery.
- Noise: Interpreting every high heart rate at the same power as lost fitness. Next step: first check sleep, heat, hydration, and residual fatigue.
- Signal: Consistency beats perfect individual rides. Next step: plan repeatable sessions instead of occasional hero efforts.
Troubleshooting: Problem, Cause, Quick Fix
- Problem: Zone 2 already feels hard after 10 to 15 minutes. Most likely cause: FTP set too high or an overly aggressive start. Quick fix: lower the target conservatively and see whether breathing and RPE return to the right range.
- Problem: Heart rate keeps climbing at the same watts. Most likely cause: heat, poor cooling, hydration issues, or accumulating fatigue. Quick fix: improve cooling and judge drift in context, not in isolation.
- Problem: ERG suddenly feels heavy and jerky. Most likely cause: cadence has dropped and resistance is ramping up. Quick fix: stabilize cadence early or reduce the target slightly.
- Problem: Power keeps surging during free riding. Most likely cause: climbs, events, or no clear power cap. Quick fix: choose flatter routes or ride structured workouts.
- Problem: Power and heart rate do not match. Most likely cause: sensor error, a different data source, or context factors. Quick fix: check sensor pairing, batteries, and whether Zwift is using trainer power or power-meter data.
- Problem: Zone 2 is mentally hard to stick with. Most likely cause: monotony, not lack of fitness. Quick fix: use cadence changes, clear block structure, or shorter sessions done more consistently.
Frequently Asked Questions
What counts as Zone 2 on Zwift: a power zone or a heart-rate zone?
On Zwift, the power zone is usually the more practical primary guide because training zones are FTP-based. Heart rate is the important cross-check. If power looks easy but heart rate is unusually high and the effort does not feel easy either, it is worth rethinking how you classify the ride.
What watts are Zone 2 on Zwift if my FTP is uncertain?
In that case, caution is better than false precision. Use your FTP-based zone as a rough starting point, then refine it using RPE, the talk test, and heart rate. If you regularly end up near the top end of what feels sustainable, your FTP is probably set too high for this purpose.
Is ERG mode useful for Zone 2, or does it make things too rigid?
ERG is useful if you want clean, steady loading. It becomes problematic when your target watts do not match how you are feeling that day, or when the cadence spiral pushes you into unnecessary strain. ERG mainly feels rigid when you ignore its feedback instead of using it.
Why is my heart rate higher on Zwift than outdoors at the same watts?
Indoors you often lose airflow, small moments of relief, and natural cooling. You also tend to sit more statically. That can make the same power feel harder internally. Sleep, stress, and hydration can amplify the effect as well. You often see the same pattern in other indoor formats, such as in our 45-minute treadmill workout guide.
How do I stop drifting out of Zone 2 on climbs in Zwift?
In free riding, a clear power cap helps, along with the willingness to let speed drop on short ramps. Alternatively, use structured endurance workouts in ERG mode. If you join events, choose them more for motivation than for precise intensity control.
How often should I ride Zone 2 each week if I also do intervals?
That depends on your total volume, experience, and recovery. Training literature often describes models with a lot of low-intensity work, but the right distribution is individual. If you are also integrating hard sessions, for example in the context of a VO2max swim protocol or while paying attention to recovery after a marathon, then Zone 2 should support your overall capacity rather than add extra fatigue.
How can I tell whether Zone 2 is working without overloading me?
Good signs include more time in zone, stable day-to-day recovery, similar or lower perceived effort at comparable power, and less post-ride soreness or heaviness. If Zone 2 regularly empties your legs, worsens your sleep, or undermines hard sessions, it was probably not as easy as intended. In the broader context of body composition and long-term health, it is also worth taking a sober look at topics like reducing body fat for women or a broader longevity protocol, rather than overinterpreting individual rides.
If you want to learn from your training over a few weeks instead of guessing after a single ride, a simple routine based on power, heart rate, RPE, drift, and sleep will help far more than chasing the perfect number on any given day.
More health topics to explore
- Heart & Cardio – Overview
- VO2max: what it means, what counts as a good value, and how to interpret it properly
- HIIT for Cardio: How to Do It Safely, Effectively, and Without Burning Out
- Heart Rate Variability Chart by Age (HRV): Ranges, Sex Differences, and How to Use Them
References
- KS et al. — Quantifying training intensity distribution in (2006)
- Zwift Insider — Powerup Zone
- Galán-Rioja MÁ et al. — Training Periodization, Intensity Distribution, and Volume in Trained Cyclist... (2023)
- Garber CE et al. — American College of Sports Medicine position stand. Quantity and quality of e... (2011)
- Billat VL et al. — Cardiac output and performance during a marathon race in middle-aged recreati... (2012)